Registration Process
To register, an Administrator will have registered you in the control panel, “Management Panel”. You will then receive an email to verify yourself and the following steps will be followed:
- In the e-mail, click on the “Verify my account” button.

- If you have already downloaded the application, click on “Continue”, otherwise you can download it by clicking on the corresponding image.
- The application will open, and the relevant permissions will be accepted.

-
You will be able to choose whether to use biometrics in the application.

The QR code that appears on the computer screen will be scanned with the Ironchip application.

With this, the registration process will be completed. You will know when the next image appears on the computer and the application opens on the mobile device.

Services
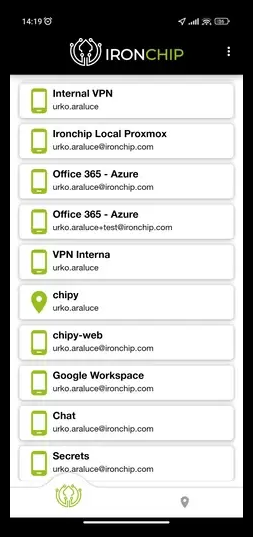
In the services tab, you will find all the services that you have access to, including the “Ironchip Management Panel” service, if the client wishes.
It's important to note that the “Ironchip Management Panel” service is exclusive to selected Administrators, who will be responsible for managing authentications and access to the services.
In these services, a countdown will appear if authentication is required for the service.

Safe Zones
Keys
In the Keys tab, you will find all the keys to which you have access. This includes keys created by yourself and those shared by other members of the company.
To create a new safe zone, follow these steps:
-
Press the “+” icon.

-
Enter a name for the safe zone.
Press “Add Safe Zone”. -

-
When the progress wheel reaches its end, the key will be created.
Authentication
Authentication Process
Once the safe zones are created and linked to the corresponding services, the authentication process can be carried out in two different ways.
The first and most common method is as follows:
To start the process, you will need to enter your credentials into the service you want to authenticate with. Upon doing so, a “push” notification will be sent to your mobile device via the Ironchip application.

Upon tapping the “push” notification, the Ironchip application will open, where we will need to enter the selected biometrics if it has been set as a requirement beforehand.

Once inside, upon tapping “Authorize,” the signal scanning screen will open, which will verify if you are in the authorized location for accessing the service or not. If you are in the correct place, you will have accessed your service.

The second way in which this process can be carried out is as simple as the previous one:
- To begin with the process, you will have to enter your credentials in the service where you want to authenticate. When you do, a “push” notification will arrive on your mobile through the Ironchip application.
- Now, instead of clicking on the “push” notification, you will go directly to the Services section of the application. In this section, on the service where you have entered your credentials, a countdown timer will be observed. This countdown shows us the remaining seconds to perform the signal scanning and thus be able to verify your identity. You must click on the card.

Version
How to view the version of the mobile application?
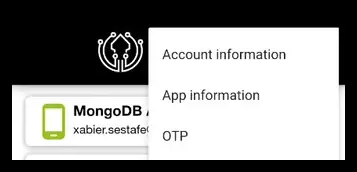
To do this, open the application, in the top bar of the application, press the three dots:

A dropdown menu will appear, click on “App info” to view the application version.

Upon pressing “App info”, a modal will appear, where you can view the application version.
In this case, the application version is 1.2.8.
